How to Create Google Tag Manager - Step by Step Guide
Are you looking to enhance your website’s data collection and tracking capabilities? Google Tag Manager (GTM) is a powerful tool that simplifies managing website tags—those snippets of code that help track user behavior, conversions, and more. Instead of editing your website’s code directly, GTM provides a streamlined, user-friendly platform to deploy and manage tags efficiently.
Whether you’re monitoring analytics, running ad campaigns, or improving user engagement, GTM allows you to do it all without technical headaches. This guide will walk you through creating your own Google Tag Manager account and container step by step. By the end, you’ll have a robust tracking system ready to optimize your website and drive business growth. Embrace the power of GTM to unlock insights, make informed decisions, and take your marketing strategies to the next level. Let’s get started!

Key Takeaways
- Discover the key advantages of using Google Tag Manager for your business
- Learn how GTM can streamline your data collection and tracking efforts
- Understand the cost-effectiveness and resource management benefits of GTM
- Gain a step-by-step understanding of setting up your first GTM account and container
- Explore the GTM interface and workspace to effectively manage your tags and triggers
How to Create Google Tag Manager - Step by Step Guide
Google Tag Manager (GTM) is a powerful tool for businesses. It changes how we look at user behaviour, marketing, and website optimisation. This platform makes managing tracking tags easy, giving companies deep insights into their audience.
Key Advantages for Business Owners
Business owners find GTM very useful. It makes setting up and changing tracking tags simple. This lets them quickly adapt to new marketing plans and data needs.
How GTM Streamlines Data Collection
At its heart, GTM makes collecting data easier. It combines many tracking tags into one place. This cuts down on manual work, reduces mistakes, and makes data collection more efficient.
Cost-Effectiveness and Resource Management
Also, GTM is good for saving money and managing resources. It helps companies save time and effort on tagging tasks. This lets them focus on important business growth strategies.
| Feature | Benefit |
|---|---|
| Centralised Tag Management | Streamlined data collection and reduced implementation time |
| Flexible Tag Modifications | Agile response to changing marketing strategies and data needs |
| Cost-Effective Implementation | Efficient resource utilisation and increased focus on strategic initiatives |
Using Google Tag Manager, businesses can get valuable insights into user behaviour. They can then improve their digital marketing and grow sustainably through smart decisions.
How to Create Google Tag Manager?
Setting up your Google Tag Manager (GTM) account is the first step. It helps you collect and analyse your website's data. This process is easy and can be done in a few steps. Let's look at the basics of Google Tag Manager setup and GTM account creation.
- Visit the Google Tag Manager website and click on the "Sign In" button.
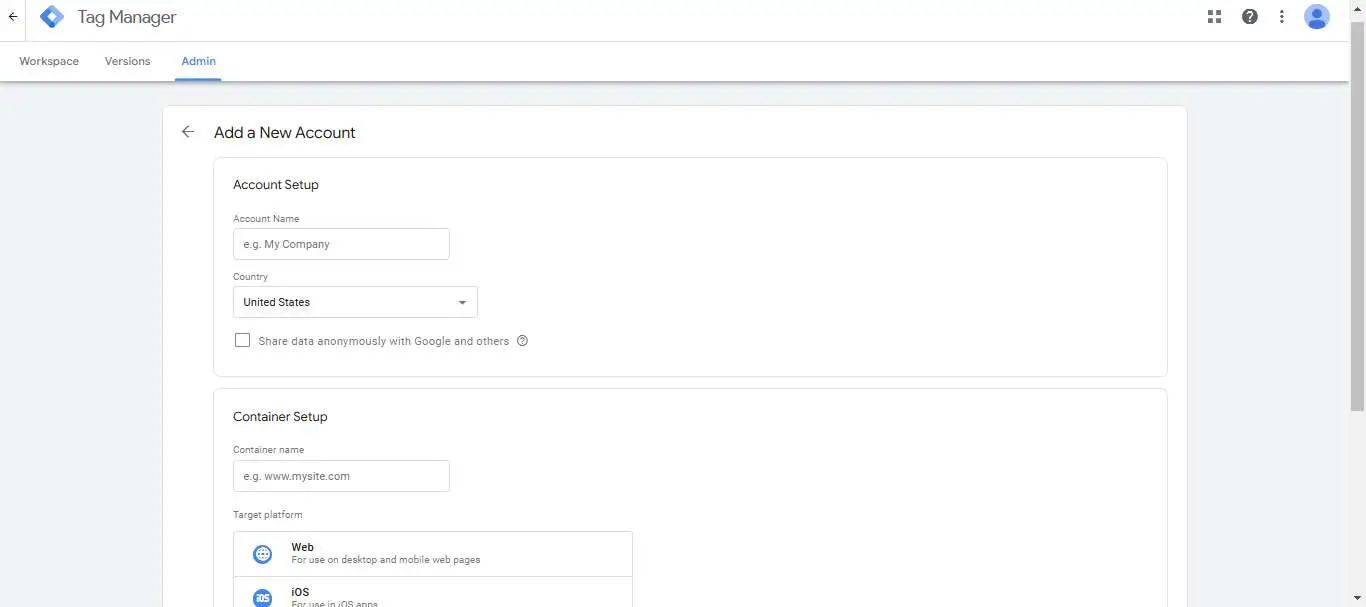
- If you don't have a Google account, create one. Once signed in, click on the "Create Account" button to start the GTM account creation process.
- Give your GTM account a name and enter your website's URL. This helps Google know your business and link your data.
- Choose the right time zone and currency for your account. These settings make sure your data is recorded and reported correctly.
- Read and agree to the Google Tag Manager Terms of Service, then click "Create" to complete your Google Tag Manager setup.

Now that your GTM account is set up, you're ready for the next step. You'll configure your container and add it to your website. This lets you track and analyse your website's performance and how users interact with it.
https://www.youtube.com/watch?v=n_3YgsWx8zA
"Google Tag Manager provides a simple way to add and update website tags - including tracking, conversion, and site measurement tags - without having to modify the website code."
Setting Up Your First GTM Account and Container
Creating a Google Tag Manager (GTM) account and setting up your first container is key. It's the first step to using this powerful tool for your website. This ensures your GTM works well and lets you manage your website's tag implementation effectively.
Creating Your Google Account Access
To start, you need a Google account. If you don't have one, create a new account. After signing in, go to the GTM portal and click "Create Account" to set up your first GTM container.
Choosing the Right Container Settings
- Choose a name for your GTM container that matches your website or business.
- Decide how you want to integrate GTM with your website, app, or other platforms.
- Check the container settings to make sure they match your privacy and data collection needs.
Installing Container Code on Your Website
Once you've set up your container, you'll get a unique GTM container code. This code needs to be added to every page of your website where you want to use GTM. Make sure to put the code in the <head> section of your website's HTML. This lets GTM work right and collect the data you need.
| Step | Description |
|---|---|
| 1. Copy Container Code | Find the container code from GTM and copy it. |
| 2. Paste into Website | Put the code snippet into the <head> section of your website's HTML. |
| 3. Publish Changes | Save the changes and publish your website to make the GTM container live. |
By following these steps, you'll have set up your first GTM account and container. This is the start of using tag implementation and collecting data on your website.

Understanding the GTM Interface and Workspace
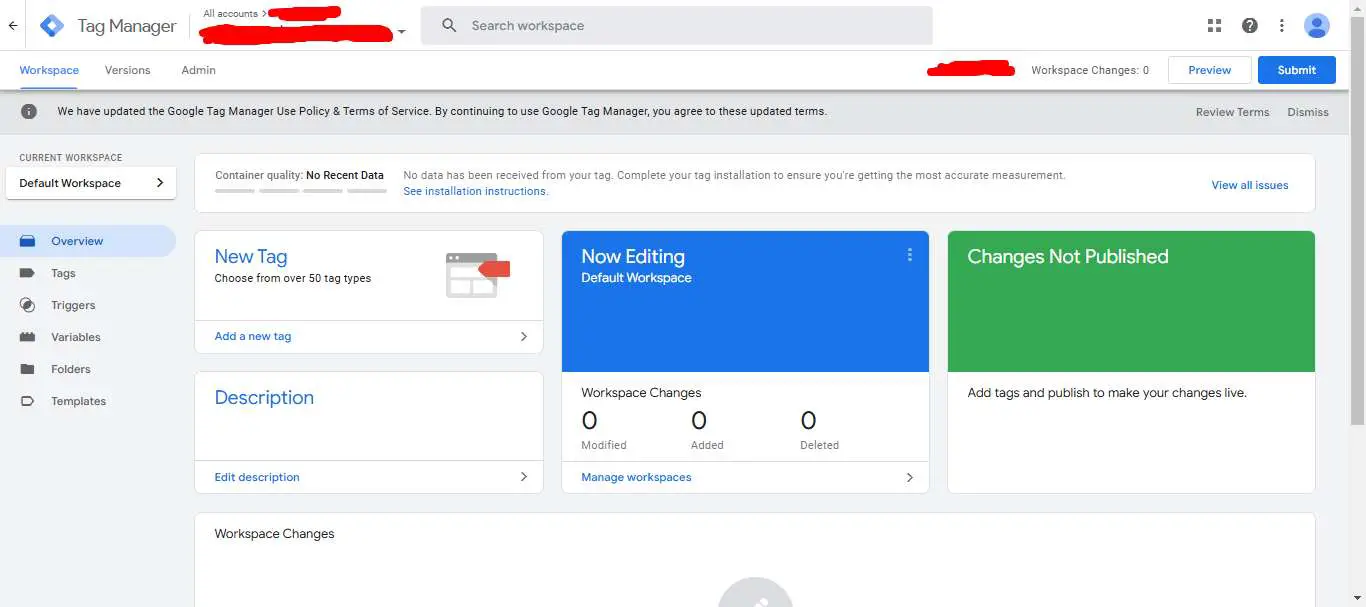
Getting to know Google Tag Manager (GTM) starts with its easy-to-use interface and large workspace. The GTM dashboard is a central place for managing and improving tag strategies. It makes it easy to navigate and work on tag management.
The GTM workspace has different parts, each with its own role. The Tag Management section is at the core. Here, users can make, set up, and use tags to get important data from their online sites.
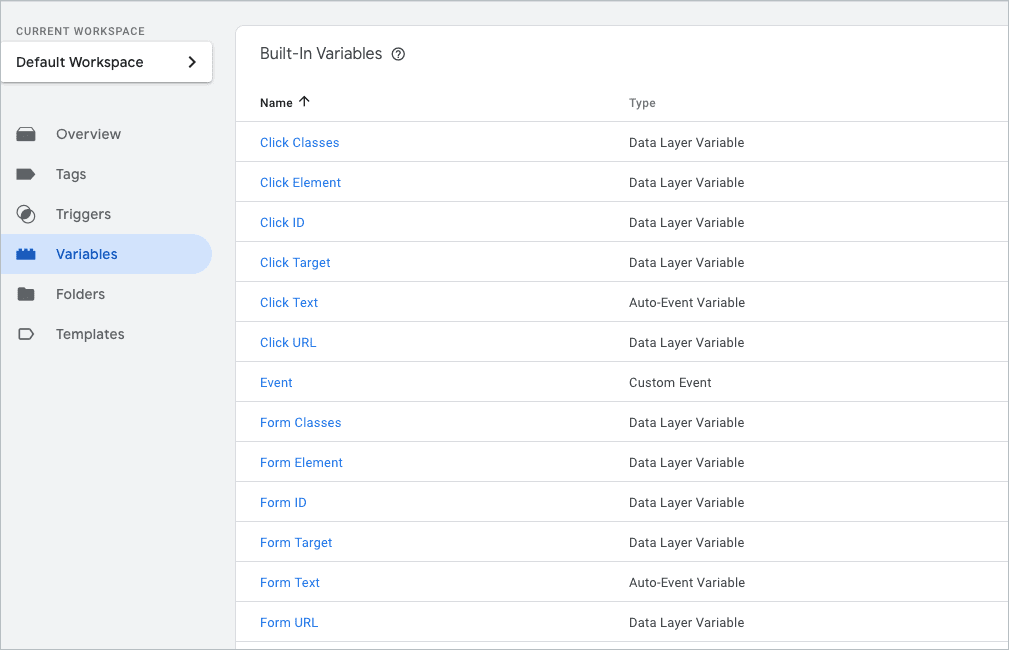
The workspace also has Triggers and Variables sections. Triggers make tags work when certain actions happen or events occur. Variables help make tag details dynamic, keeping data precise and relevant.
| GTM Workspace Component | Description |
|---|---|
| Tag Management | Create, configure, and deploy tags to capture data across digital assets |
| Triggers | Define the conditions that trigger the firing of tags |
| Variables | Dynamically populate tag parameters to ensure data accuracy and relevance |
Understanding the GTM workspace helps users use the tag management interface fully. It makes data collection, tag use, and improvement easier.
"The GTM interface offers a seamless and intuitive experience, empowering users to take control of their tag management strategies and unlock valuable insights from their digital data."
Creating and Managing Tags in GTM
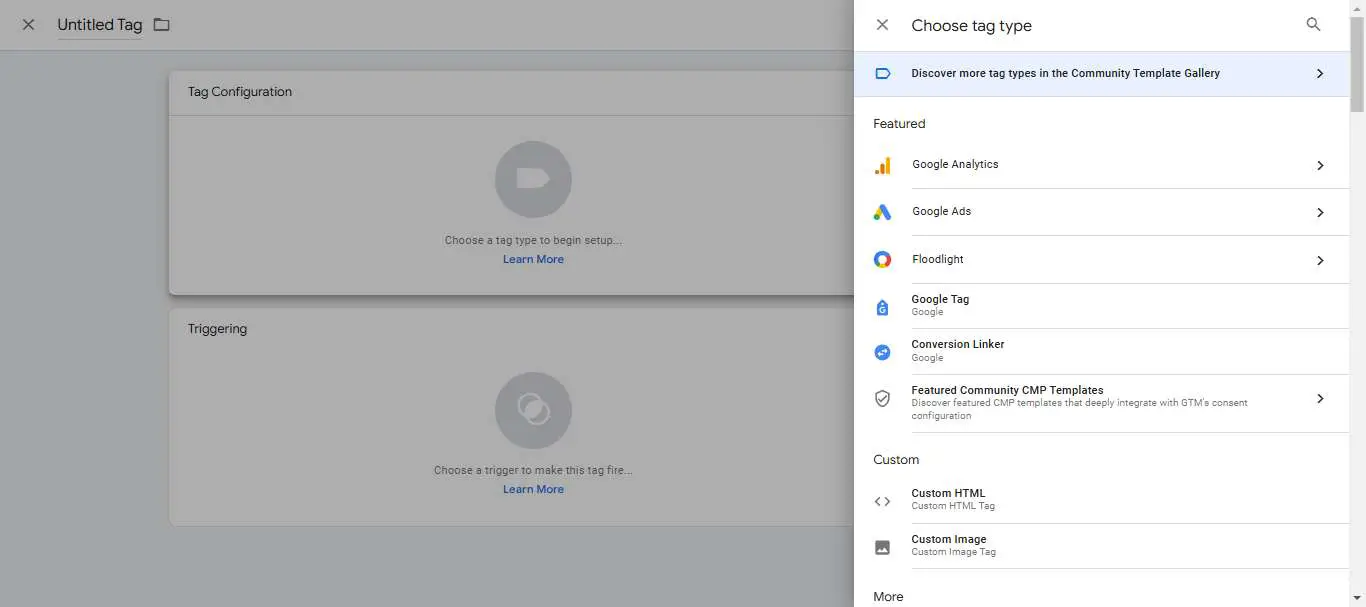
Google Tag Manager (GTM) helps marketers manage their marketing tags well. It's great for tracking conversions and managing tags. By knowing about different tag types and how to set them up, businesses can boost their online marketing.
Common Tag Types and Their Uses
GTM has many tag types for different marketing and analytics needs. Here are some common ones:
- Google Analytics tags track website activities and user behaviour.
- Conversion tracking tags measure marketing campaign success.
- Facebook Pixel tags help with retargeting and building audiences on social media.
- Google Ads tags track ad performance and help improve campaigns.
Tag Configuration Best Practices
To get accurate data and manage tags well, follow these best practices. This includes:
- Give tags clear names and group them for easy management.
- Make sure tag settings match your marketing or analytics goals.
- Set up triggers and variables to fire tags at the right times.
- Keep tag settings up to date as your marketing plans change.
Testing Tag Implementation
Testing tags before they go live on a website is key. GTM's preview and debug modes help with this. They let marketers check if tags are firing correctly and collecting data right. Testing tags well ensures marketing data is reliable and useful.
Mastering tag creation and management in Google Tag Manager unlocks digital marketing's full potential. It leads to better decision-making and marketing results.
Implementing Triggers and Variables
In the fast-paced world of digital marketing, knowing about triggers and variables in Google Tag Manager (GTM) is key. Triggers make sure tags fire at the right times, giving your tools the data they need. Variables help capture dynamic data, giving insights into how users interact with your site.
Defining GTM Triggers
Triggers in GTM are conditions that must be met before a tag fires. They can be page views, clicks, form submissions, or timer events. By setting up triggers well, you can get the most out of your data, helping your business grow.
Utilising Custom Variables
Custom variables in GTM let you collect and share dynamic data with your tools. This could be product details, user info, or specific actions. Using custom variables helps you understand your customers better, improving your marketing.
Integrating Event Tracking
Event tracking in GTM lets you track more than just page views. It tracks button clicks, video views, and downloads. This gives you detailed insights into what your customers like and do.
Mastering triggers and variables in GTM unlocks your marketing's full potential. With this knowledge, you can make better decisions, improve your campaigns, and grow your business.
| GTM Trigger Type | Description | Use Case |
|---|---|---|
| Page View | Fires a tag when a specific page is loaded | Tracking visits to key pages or content sections |
| Click | Fires a tag when a user clicks on a specified element | Monitoring button clicks, link interactions, or form submissions |
| Timer | Fires a tag after a specified time delay or interval | Measuring user engagement and time spent on site |
| Custom Event | Fires a tag when a custom event is triggered by your website or app | Tracking unique user actions or interactions |
"Implementing triggers and variables in GTM is essential for unlocking the true power of your data and driving meaningful business growth."

Connecting Google Analytics with GTM
Linking Google Analytics with Google Tag Manager (GTM) boosts your data collection and analysis. This connection gives businesses deeper insights into their website's performance and user behaviour.
Setting Up GA4 Integration
To start, set up the new Google Analytics 4 (GA4) property. GA4 is more advanced and tracks data better than Universal Analytics. You'll need to create a new GA4 property and link it to your GTM container.
Tracking Code Implementation
After setting up GA4, implement the tracking code on your website. GTM automatically generates and deploys the tracking code. This ensures consistent data collection and reduces errors.
Data Verification Methods
- Verify data accuracy and consistency after implementing GA4 via GTM. This can be done by:
- Comparing GA4 data with GTM's Preview mode
- Monitoring real-time reports in GA4 to check for correct tracking
- Using third-party tools to cross-check data and find discrepancies
Implementing a detailed data verification process ensures the reliability of your Google Analytics data. This allows for informed decision-making based on accurate insights.
| Feature | Google Analytics Integration | GA4 Setup | Data Verification |
|---|---|---|---|
| Description | Seamless integration of Google Analytics with Google Tag Manager to enhance data collection and analysis | Setting up the new Google Analytics 4 (GA4) property and linking it to the GTM container | Verifying the accuracy and consistency of data between GTM and GA4 using various methods |
| Benefits | Improved data insights, streamlined data management, and reduced risk of manual errors | Access to more advanced data tracking capabilities offered by GA4 | Ensures the integrity of data, enabling informed decision-making |
By using Google Analytics integration with GTM, businesses can gain valuable data insights. These insights help drive strategic decisions and improve their online presence.
Event Tracking and Custom Configurations
In the fast-paced world of digital marketing, knowing how users behave is key. Google Tag Manager (GTM) helps by offering custom event tracking and complex configurations. This lets businesses understand their audience better.
GTM is great for tracking more than just pageviews and clicks. It lets you monitor things like form submissions and video views. This detailed data helps businesses make better choices and improve their online strategies.
Also, GTM is very flexible. It can be set up to meet specific needs, from working with other tools to creating detailed data layers. This means marketers can create tracking solutions that really help their business.
- Leverage custom event tracking to gain deeper insights into user behaviour
- Implement advanced GTM configurations to meet specific business needs
- Optimise website performance and customer experience through data-driven decisions
| Feature | Benefit |
|---|---|
| Custom Event Tracking | Gain granular insights into user interactions beyond standard pageviews and clicks |
| Advanced Configurations | Tailor GTM to your unique business requirements and integrate with third-party tools |
"With the power of custom event tracking and advanced GTM configurations, we were able to uncover unexpected user insights that transformed our digital strategy and led to a significant increase in conversions."
Google Tag Manager's features open up many chances for businesses to improve their online presence. They can use this data to give their customers the best experience possible.
GTM Debug Mode and Testing
Working with Google Tag Manager (GTM) means you need to test and debug tags well. This ensures they work right and collect the right data. GTM's debug mode is a great tool for this, letting you check tags before they go live.
Using Preview Mode Effectively
GTM's preview mode lets you see tags, triggers, and variables on a webpage. It helps you check if tags are working right and find problems before they affect your data. Here's how to use it well:
- Open the GTM interface and find the container you want to preview.
- Turn on preview mode and open the webpage you're testing.
- Interact with the page and watch the debug console to see tags firing.
- Fix any issues or unexpected tag behaviour.
Troubleshooting Common Issues
While debugging GTM, you might find problems like tags not firing or data not matching. Here's how to fix these issues:
- Double-check your tag and trigger setups to make sure they're right.
- Look for JavaScript errors or conflicts that might be blocking your tags.
- Make sure your website's tag testing is working with GTM.
- Work with your development team to solve technical problems.
Version Control Management
It's key to manage versions well when updating your GTM container. GTM has built-in version control to help you:
- Keep track of changes to your container over time.
- Go back to a previous version if needed.
- Work with your team on updates and releases.
- Keep your GTM setup organised and have a clear audit trail.
Using GTM's debug mode, testing tools, and version control makes debugging easier. It helps ensure your data is accurate and keeps your GTM setup efficient.
Conclusion
In this guide, we've looked at how Google Tag Manager (GTM) boosts website analytics. It helps businesses collect data better, use resources wisely, and understand their marketing better. This leads to more effective marketing plans.
Using GTM is a smart move. It works well with Google Analytics, letting users track important data and see how users behave. The easy-to-use GTM interface makes it simple to manage tags, triggers, and variables. This ensures data is collected smoothly and efficiently.
We suggest you use the tips from this guide to get the most out of Google Tag Manager. By doing so, you'll improve your website analytics, make better decisions with data, and enhance your marketing. This will help your business succeed in the long run.
FAQ
What is Google Tag Manager and how does it work?
Google Tag Manager is a free tool for managing marketing tags on websites or apps. It helps you add and update tags easily without changing your website's code. This makes tracking and marketing more efficient.
What are the key benefits of using Google Tag Manager?
Google Tag Manager offers many benefits. It helps collect data better, improves analytics, and saves money. It also makes marketing more agile by tracking user behaviour and conversions.
How do I create a Google Tag Manager account and container?
First, sign in to your Google account and go to the Google Tag Manager website. Then, create a new account and set up your first container. This container code goes on your website.
How do I install the Google Tag Manager container code on my website?
Copy the code snippet from Google Tag Manager. Then, paste it into the section of your website's HTML. This lets GTM manage your tracking tags.
How do I create and configure tags in Google Tag Manager?
In the Google Tag Manager interface, you can make different tags. Choose the tag type, set its settings, and decide when it should fire. This includes tags for Google Analytics and Facebook Pixel.
How can I use Google Tag Manager to improve my website's data collection and analysis?
Google Tag Manager helps track your website better. You can set up custom variables and tags. This way, you can collect more detailed data and track conversions to improve your site and marketing.
How do I troubleshoot and debug issues with Google Tag Manager?
GTM has a preview and debug mode for testing tags. You can also use version control and history to review and undo changes. GTM has resources and community support for troubleshooting.


